Configuring DMARC
By Zach Cohen•
Uncategorized
This is a walkthrough for configuring your DNS settings with "DMARC" in your domain provider. The steps below for configuration should apply to whatever sending service you use.
DMARC (Domain-based Message Authentication, Reporting, and Conformance)
- First, login to your domain provider. Select "Domain List" and choose the domain you're configuring. Then click "Advanced DNS Settings" and you will see your records.
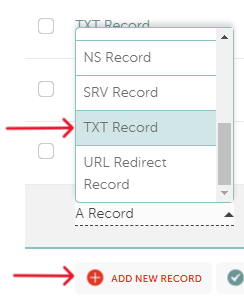
- Next, you will create a new "TXT" record
- In the "Host" field, input "_dmarc"
- Navigate to "https://dmarc.postmarkapp.com/" to generate your DMARC
- Input an email address into the "Your Email Address" field (for monitoring DMARC reports)
- Input your domain name into the "Send Reports about this Domain" field
- Copy and paste the DMARC provided by postmarkapp into the "Value" field of the "TXT" record
- Change the "p=none" to "p=reject" to instruct receiving servers to reject mail not passing SPF and DKIM checks
- Save your changes
Having DMARC in place used to be a recommendation, but in today's email infrastructure, it's imperative to have it configured correctly. Modern spam filters often don't let emails through at all if DMARC is not set-up. (Be aware that you may need to wait up to 72 hours for your DNS settings to update.)
If you're unsure about the set-up and would like a walkthrough, don't hesitate to reach out. You can book a meeting HERE.